I've two hand knit sweaters that saw much use over the last week or so. Both are raglan sleeve, top down construction in a chunky to bulky+ weight yarn. One is a hooded pullover, the other is a cardigan. Because of the yarn (actual) weight both were very saggy around the shoulders, and not snugging up against the back of my neck. I was actually considering frogging and re-knitting the cardigan at a tighter gauge. Instead, I decided to add a row of crochet chain stitch around the shoulders and back neck of each sweater. It didn't take very long at all, and the sweaters fit much better now, and the hood on the pullover fits better. I learned something too. Next time I'm knitting a top down raglan, I'll use a very firm cast on for the neck edge, and figure out a way to reinforce the increases as I continue to shape the neck. Depending on the yarn, I'll probably work with a smaller needle size to get tighter gauge. If I'm working the other direction, bottom to top, well, bind-offs tend to be tighter anyway. But, when I knit the hooded pullover, I intentionally made a neck seam to give that area more support, and it still ended up needing reinforcement.
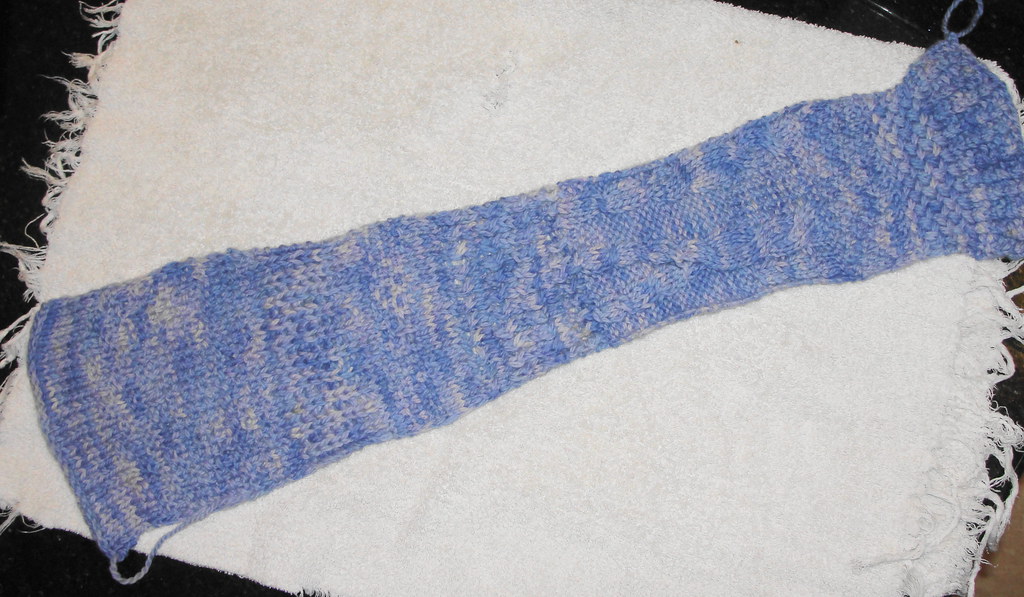
On to planning. Pretending to be a wise knitter, I swatched different stitch patterns with the yarn from the frogged Pinwheel sweater. I craving cables, but doubt that cables and the hand dyed color of the yarn are a good match. There are plenty of other types of stitch texture to explore, and so I started. I even included a cable section, just in case I was wrong about the cables. I wasn't.
From left to right, starting on US 10 1/2 needles; stockinette, double moss, seed, purl ridge and switch to US 10 needles, seed, brioche, linen, stockinette, an absolutely hideous attempt at some crossed stitches (very bad instructions in the book I was using), ugly cabled section where I played with traveling cables and other things, risotto, woven basket (what I was trying to do further down, different stitch book) and blanket rib. The stitch count remained the same throughout the sample, except for the linen stitch where I needed to decrease by one stitch to get a odd number. I think its interesting to see the variation in width.
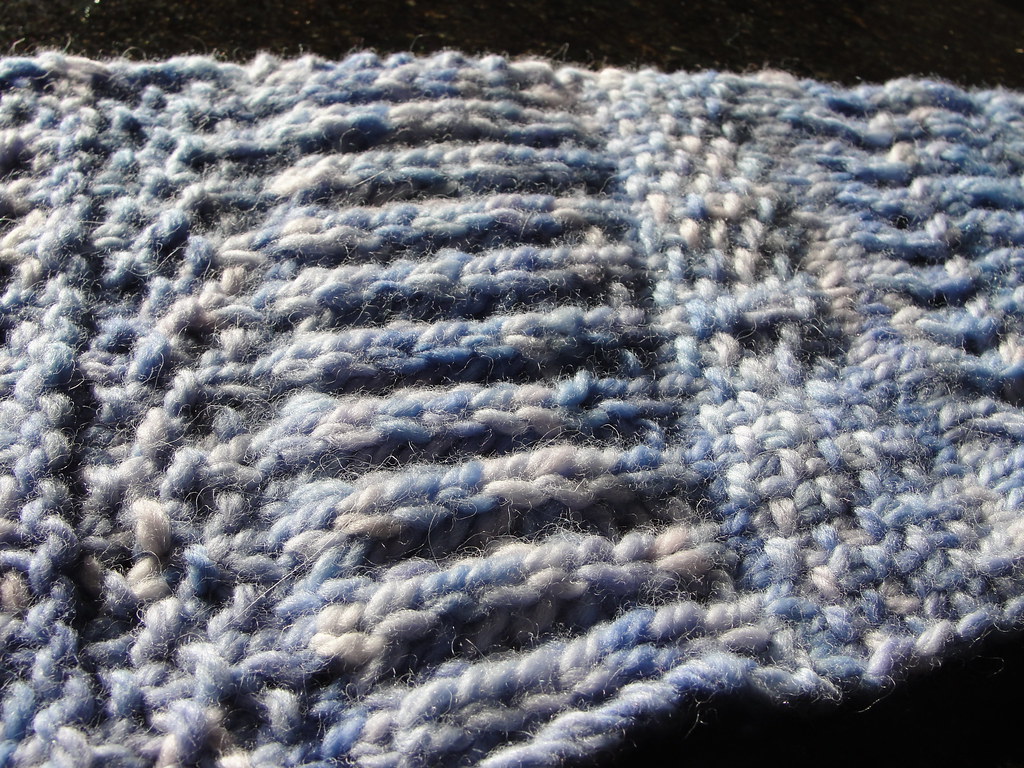
Here are some closeups of the parts I like;
The double moss, seed, brioche and linen bits. The double moss and seed look very close in gauge to the stockinette. The linen looks woven and is somewhat stretchy. The brioche is thick and cushy with deep ribs, and is very stretchy.
See how deep the brioche stitch is? I can also see the stitch mistake in the linen stitch.
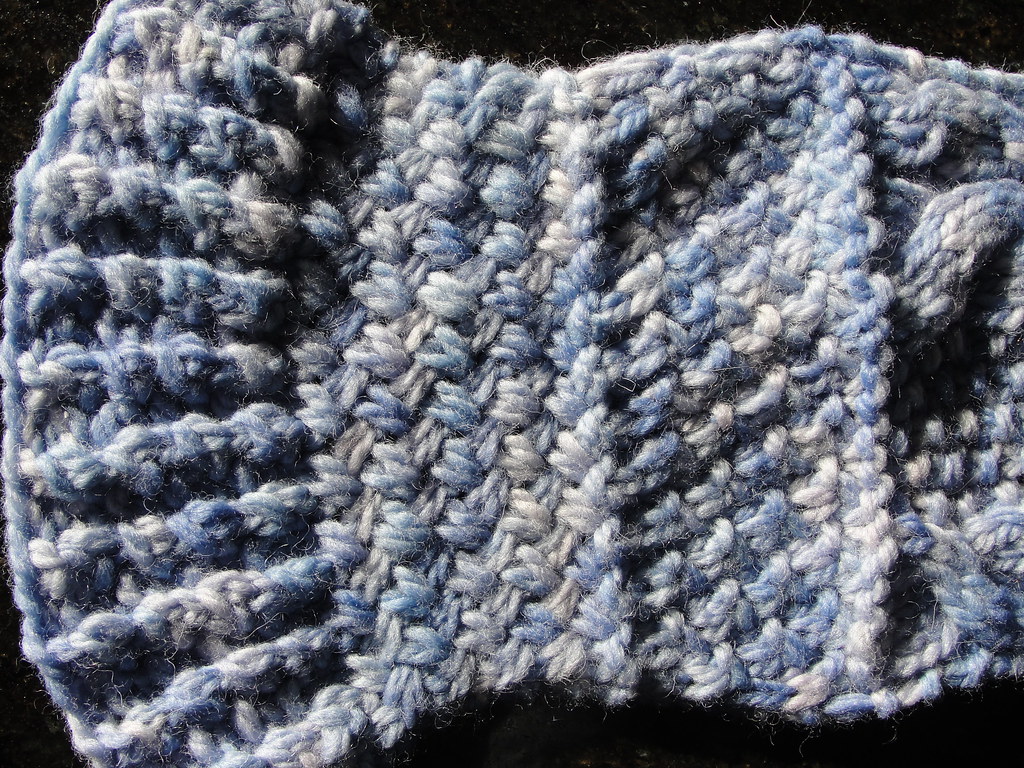
From left to right; blanket rib, woven basket, risotto. The blanket rib is thick and stretchy. The woven basket is not stretchy at all, and is maybe only 2/3 the width of the stockinette at the beginning of the swatch. I think the colors of the yarn look very nice in this stitch. The risotto stitch is much stretchier than the woven basket, and its a reversible stitch, it makes a thick, cushy texture.
About halfway through the sample I was ready stop and toss it all in the dye pot, and I very nearly did. Sticking with it payed off, I really like the last three stitches. If I'd given in to the call of the dye pot, I might never know how fun these stitches are.
Now its back to swatching, making larger samples of the stitch patterns in the last two pictures. I want to use at least some of them together, and need to find out if they play nice together. I'm sure at least a few of them will.
Showing posts with label hoodie. Show all posts
January 17, 2013
March 18, 2009
Yea! Choco-Java Bean Hoody Done!
OK, I know I said it was done already, but now I can add pictures and details. The pictures because anyone reading this might like to see how it turned out, and details in case I ever want or need to remember what I did. Can you see how the color changes going from hood to hem?

When I dyed the yarn, I didn't have a pot large enough to fit the full kilo of yarn, so I did batches and ended up with 2 or 3 hanks of yarn in each batch. While I did weigh out the amount of each dye I used, I wasn't to concerned with making all the hanks exactly the same. By the way, I purchased this yarn from DeNaturaWools of Uruguay. It is Corridale wool, soft enough for me to wear next to my skin (and I really don't like itchy things), and tough enough for outer wear like a... sweatshirt! Plus, it has a slight luster to it, and I like that.
After dying the yarn, or maybe even before, I knew I wanted to knit it into a hooded sweatshirt. (Wow, sweatshirt... really, that sounds gross, think about it! From now on its just a hoodie.) But it took me a while to decide what pattern I wanted to use. And then the holiday season rolled around and I had other things to knit. Finally, I had time to consider patterns. I looked online, I looked in magazines, I queried my knitting friends. I saw lots of patterns I liked, but none that seemed right for this yarn, which I was deteremined to use. Click here for that discussion. Whew, I almost started repeating my earlier post. Uh-oh, I did repeat myself. Must be time for another picture.

Look! There's my cell phone peaking out of its own special pocket.
Below is a basic outline of how I built my hoody; if you don't care about the nuts and bolts, just scroll down to the next picture.
CO 16 sts using long tail provisional cast-on, there will be 32 sts total when both sides of the caston are knit. Hood and neckline are knit flat and then joined at bottom of placket and body of sweater is knit in the round. Place marked at back end of row. For this hoody, I used moss stitch for the first 4 sts at the face opening. Knit 10 increase row (2 increases at back of hood on rs row, on either side of marker). I think 8 or 9 increase rows would have been fine too.
Time for wrap and turn (w&t) shaping in the hood, this adds ease and fullness around the face when the hood is up, and I think improves the look of how the hood rests across the shoulders when worn down.
Continue knitting in pattern until hood measures approximately 12" from top to needles and start short row shaping on next rs row; knit in pattern for next 16 sts (about 7 or 8") and w&t and purl back in pattern. RS row, knit in pattern for next 13 sts and w&t, leaving 2 unworked sts between w&t and purl back in pattern. Make a total of 4 w&t and on the next rs row knit in pattern to end, picking up and knitting all wrapped stitches as you come to them.
Now its time to do the same w&t for the other side of the hood, except this time its done on the purl side. After the 4th series of w&t, purl in pattern all the way across, picking up and purling the wrapped stitches as you come to them.
rs - knit across in pattern
Now its time for the shoulder/neck bind off. I'm not entirely sure this is neccessary, but I think it might help keep some shaping in the sweater;
ws - work in pattern for 11 sts, bind off next 21 sts knitwise, work next 11 sts in pattern,
rs - work in pattern for 11 sts, pick up and knit next 21 sts across shoulders and neck and work remaining 11 sts in pattern.
Now its time to place markers for the shoulder seams;
ws - work in pattern for 11 sts, pm, p8, pm, p14, pm, p8, pm, work in pattern to end of row.
rs - for this row and following rows until desired sleeve depth is reached, work in pattern until stitchs flanking marker, k1-f/b before and after each marker. I worked until the sleeve portion contained 36 stitches. ws rows are worked in pattern. At some point the neckline is deep enough and the fronts can be joined and knitting can procede in the round. I joined the fronts on a rs row by overlapping the moss stitch portions, 4 sts for each front (right over left in this case) and knitting those sts together 3 needle bind off style, except I didn't do the binding off part. If I'm still working increases (I was), now increases are made every other round. Once the sleeve depth is good, the sleeve stitchs are placed on waste yarn and the body is joined under the arms and continues knitting in the round. I added one backwards loop cast on at each underarm. In hindsight, I probably didn't need those 2 extra stitches.
The body knits along pretty quickly, and when it was nearly as long as I wanted it, I switched to US #10.5 needles, knit one round and then started a k2p1 ribbing (I think I had to adjust the stitch count), worked for about 2" and then cast off purlwise.
Sleeves - starting with a new ball of yarn and #13 needles, pick up and knit the live sts on the waste yarn, place marker at center underarm and backwards loop cast on one stitch at underarm. Join round. Knit one round, next round and every 7th round after, decrease one st at each side of maker. Decrease until 25 sts remain. (I did this one stitch away from marker) Switch to US #10.5 needles and knit one more round, decreasing one more stitch. 24 sts in round. Beginning of next round, *k2, k2tog and repeat from * til end of round. Next round, k2p1 ribbing, I worked this for 2", then put in a one stitch buttonhole to act as a thumb hole, then worked one more inch of ribbing before binding off purlwise. The cuffs are long enough that when I put my thumbs in the buttonholes the cuffs are like fingerless mitts, and also long enough to be turned back out of the way. I did have holes at the underarm area that I closed with yarn, but they weren't so bad.
Sleeve pocket - I kicked around a bunch of different ideas for a cell phone sized pocket on my right sleeve, I'm sure the garment industry has a name for this sort of thing. I wanted something that would hold my phone securely with out flaps or buttons to fuss with. I finally decided on a mostly closed pocket that opened to the side nearest my body. That way if I raised my hands up over my head, like in a victory celebration for instance, the cell phone wouldn't slide out. The next step was to figure out how to knit the pocket on as seamlessly as possible. I got close, 3 sides out of the 4 are knit on. Here's how I did it, as best as I can remember;
I pulled out a length of yarn, a contrasting yarn here in a slightly smaller size, and broke off about 24 inches. The pocket needed to be about 3" wide by 5" tall. With the length of yarn held inside the sleeve, I used a crochet hook to pull a loop of yarn through a stitch, and then another loop of yarn through the space between stitches 12 times, equalling 24 stitches over the 3" row that formed the pocket bottom. With that same length of yarn I now pulled a loop up through a line of stitches, every other stitch until about 5" of lenght was reached. Actually, a little longer than 5".
Since I wasn't sure how this would work out, I went back to the bottom 24 sts with my ball of green yarn and beginning at the edge closest to the body ( I think, I was tired when I stated), I picked up and knit across those 24 sts and knit into the lowest of the vertical loops at the edge. On the purl side I slipped the first st knitwise and then purled across (except I didn't want to turn the work, so I knit it backwards). Next rs row I knit across until last st, then knit that last stitch with the next loop in the line of vertical loops. I must say I thought it was working rather well.
Once I got close to the top of the pocket, I decided to work loops back across the horizontal top, but then realized I didn't think it would work; I wasn't sure how to knit into loops at the top and have it look right. So instead I knit my first backwards st, then slid that st off the needle and over a yarn needle threaded with the 'loop' length of yarn pulled through from the inside of the sleeve and proceded to do the same for each st on the needle until the pocket top was done. I finished the pocket off using a mattress stitch to partially close a portion of the pocket on open side, leaving an opening just over halfway up that my cell phone would fit through.
I wove in the few loose tails, most were woven in durning knitting, closed up the underarm holes, and now I have this wonderful hoodie to wear. I still plan on adding buttons, or something, to the neck placket, but for now I'm just really enjoying wearing this.
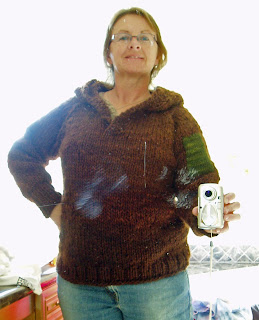
Oops, my bathroom mirror must be dirty! I was surprised and I'll admit, pleased, to receive several complements on this hoodie today while I was with Kelie at the Farmers Market in Vista. That was fun too, so many wonderful, nice people, and we met Kathy Lambert there; she sells organic wool, roving, and the yarn she spins from her flock of sheep, goat and llama. I think I'll go back next week. :-)
When I dyed the yarn, I didn't have a pot large enough to fit the full kilo of yarn, so I did batches and ended up with 2 or 3 hanks of yarn in each batch. While I did weigh out the amount of each dye I used, I wasn't to concerned with making all the hanks exactly the same. By the way, I purchased this yarn from DeNaturaWools of Uruguay. It is Corridale wool, soft enough for me to wear next to my skin (and I really don't like itchy things), and tough enough for outer wear like a... sweatshirt! Plus, it has a slight luster to it, and I like that.
After dying the yarn, or maybe even before, I knew I wanted to knit it into a hooded sweatshirt. (Wow, sweatshirt... really, that sounds gross, think about it! From now on its just a hoodie.) But it took me a while to decide what pattern I wanted to use. And then the holiday season rolled around and I had other things to knit. Finally, I had time to consider patterns. I looked online, I looked in magazines, I queried my knitting friends. I saw lots of patterns I liked, but none that seemed right for this yarn, which I was deteremined to use. Click here for that discussion. Whew, I almost started repeating my earlier post. Uh-oh, I did repeat myself. Must be time for another picture.
Look! There's my cell phone peaking out of its own special pocket.
Below is a basic outline of how I built my hoody; if you don't care about the nuts and bolts, just scroll down to the next picture.
CO 16 sts using long tail provisional cast-on, there will be 32 sts total when both sides of the caston are knit. Hood and neckline are knit flat and then joined at bottom of placket and body of sweater is knit in the round. Place marked at back end of row. For this hoody, I used moss stitch for the first 4 sts at the face opening. Knit 10 increase row (2 increases at back of hood on rs row, on either side of marker). I think 8 or 9 increase rows would have been fine too.
Time for wrap and turn (w&t) shaping in the hood, this adds ease and fullness around the face when the hood is up, and I think improves the look of how the hood rests across the shoulders when worn down.
Continue knitting in pattern until hood measures approximately 12" from top to needles and start short row shaping on next rs row; knit in pattern for next 16 sts (about 7 or 8") and w&t and purl back in pattern. RS row, knit in pattern for next 13 sts and w&t, leaving 2 unworked sts between w&t and purl back in pattern. Make a total of 4 w&t and on the next rs row knit in pattern to end, picking up and knitting all wrapped stitches as you come to them.
Now its time to do the same w&t for the other side of the hood, except this time its done on the purl side. After the 4th series of w&t, purl in pattern all the way across, picking up and purling the wrapped stitches as you come to them.
rs - knit across in pattern
Now its time for the shoulder/neck bind off. I'm not entirely sure this is neccessary, but I think it might help keep some shaping in the sweater;
ws - work in pattern for 11 sts, bind off next 21 sts knitwise, work next 11 sts in pattern,
rs - work in pattern for 11 sts, pick up and knit next 21 sts across shoulders and neck and work remaining 11 sts in pattern.
Now its time to place markers for the shoulder seams;
ws - work in pattern for 11 sts, pm, p8, pm, p14, pm, p8, pm, work in pattern to end of row.
rs - for this row and following rows until desired sleeve depth is reached, work in pattern until stitchs flanking marker, k1-f/b before and after each marker. I worked until the sleeve portion contained 36 stitches. ws rows are worked in pattern. At some point the neckline is deep enough and the fronts can be joined and knitting can procede in the round. I joined the fronts on a rs row by overlapping the moss stitch portions, 4 sts for each front (right over left in this case) and knitting those sts together 3 needle bind off style, except I didn't do the binding off part. If I'm still working increases (I was), now increases are made every other round. Once the sleeve depth is good, the sleeve stitchs are placed on waste yarn and the body is joined under the arms and continues knitting in the round. I added one backwards loop cast on at each underarm. In hindsight, I probably didn't need those 2 extra stitches.
The body knits along pretty quickly, and when it was nearly as long as I wanted it, I switched to US #10.5 needles, knit one round and then started a k2p1 ribbing (I think I had to adjust the stitch count), worked for about 2" and then cast off purlwise.
Sleeves - starting with a new ball of yarn and #13 needles, pick up and knit the live sts on the waste yarn, place marker at center underarm and backwards loop cast on one stitch at underarm. Join round. Knit one round, next round and every 7th round after, decrease one st at each side of maker. Decrease until 25 sts remain. (I did this one stitch away from marker) Switch to US #10.5 needles and knit one more round, decreasing one more stitch. 24 sts in round. Beginning of next round, *k2, k2tog and repeat from * til end of round. Next round, k2p1 ribbing, I worked this for 2", then put in a one stitch buttonhole to act as a thumb hole, then worked one more inch of ribbing before binding off purlwise. The cuffs are long enough that when I put my thumbs in the buttonholes the cuffs are like fingerless mitts, and also long enough to be turned back out of the way. I did have holes at the underarm area that I closed with yarn, but they weren't so bad.
Sleeve pocket - I kicked around a bunch of different ideas for a cell phone sized pocket on my right sleeve, I'm sure the garment industry has a name for this sort of thing. I wanted something that would hold my phone securely with out flaps or buttons to fuss with. I finally decided on a mostly closed pocket that opened to the side nearest my body. That way if I raised my hands up over my head, like in a victory celebration for instance, the cell phone wouldn't slide out. The next step was to figure out how to knit the pocket on as seamlessly as possible. I got close, 3 sides out of the 4 are knit on. Here's how I did it, as best as I can remember;
I pulled out a length of yarn, a contrasting yarn here in a slightly smaller size, and broke off about 24 inches. The pocket needed to be about 3" wide by 5" tall. With the length of yarn held inside the sleeve, I used a crochet hook to pull a loop of yarn through a stitch, and then another loop of yarn through the space between stitches 12 times, equalling 24 stitches over the 3" row that formed the pocket bottom. With that same length of yarn I now pulled a loop up through a line of stitches, every other stitch until about 5" of lenght was reached. Actually, a little longer than 5".
Since I wasn't sure how this would work out, I went back to the bottom 24 sts with my ball of green yarn and beginning at the edge closest to the body ( I think, I was tired when I stated), I picked up and knit across those 24 sts and knit into the lowest of the vertical loops at the edge. On the purl side I slipped the first st knitwise and then purled across (except I didn't want to turn the work, so I knit it backwards). Next rs row I knit across until last st, then knit that last stitch with the next loop in the line of vertical loops. I must say I thought it was working rather well.
Once I got close to the top of the pocket, I decided to work loops back across the horizontal top, but then realized I didn't think it would work; I wasn't sure how to knit into loops at the top and have it look right. So instead I knit my first backwards st, then slid that st off the needle and over a yarn needle threaded with the 'loop' length of yarn pulled through from the inside of the sleeve and proceded to do the same for each st on the needle until the pocket top was done. I finished the pocket off using a mattress stitch to partially close a portion of the pocket on open side, leaving an opening just over halfway up that my cell phone would fit through.
I wove in the few loose tails, most were woven in durning knitting, closed up the underarm holes, and now I have this wonderful hoodie to wear. I still plan on adding buttons, or something, to the neck placket, but for now I'm just really enjoying wearing this.
March 17, 2009
Hoody done, clapotis for fun
Yay yay yay, my hoody is done and I love it. Pictures coming soon. I started a clapotis yesterday, using delicious Manos silk wool blend.
March 9, 2009
Rip it Good
Anyone remember the band Devo?
Ok, so I frogged the entire project Friday, and I'm starting all over again. I had everything done but the right sleeve. It would have been ok, but not just what I wanted.
So, off we go again. Using a long tail provisional cast on, cast on 16 sts = 32 sts total when both sides knit. Use seed st for hood edge, 4 sts. Knit a total of 10 increase rounds; 52 sts.
Now its Monday afternoon. My hoodie is knit down to just below the armpits and going well. A good part of this was done on Saturday as I played knitting navigator while Kelie (see her blog for a list of shops and prizes) drove us around a local Shop Hop. Along with Edina, we hit 9 shops in one day. It was fun, but we were tired puppies when we hit that last shop at 5 p.m. This was my first ever Shop Hop, and I think its a great idea. Thank you Kelie, for driving and thank you Edina for the donuts that fueled us for so much of the day.
Would you care for a little whine with that....
Ouch, I was in to see the Dentist today, I have a crown that needs replacing. The good Dr. removed the existing crown and then did lots of grindy stuff (at one point my head was rattling so much I think he was using an actual drill bit), and then he put a LASER in my mouth. Which was fine while half of my face was numb, even when I smelled smoke (why was there smoke coming out of my mouth?), but now it does ache and my gums are not happy about this. Motrin has little effect, perhaps its time for a glass of something...
Ok, so I frogged the entire project Friday, and I'm starting all over again. I had everything done but the right sleeve. It would have been ok, but not just what I wanted.
So, off we go again. Using a long tail provisional cast on, cast on 16 sts = 32 sts total when both sides knit. Use seed st for hood edge, 4 sts. Knit a total of 10 increase rounds; 52 sts.
Now its Monday afternoon. My hoodie is knit down to just below the armpits and going well. A good part of this was done on Saturday as I played knitting navigator while Kelie (see her blog for a list of shops and prizes) drove us around a local Shop Hop. Along with Edina, we hit 9 shops in one day. It was fun, but we were tired puppies when we hit that last shop at 5 p.m. This was my first ever Shop Hop, and I think its a great idea. Thank you Kelie, for driving and thank you Edina for the donuts that fueled us for so much of the day.
Would you care for a little whine with that....
Ouch, I was in to see the Dentist today, I have a crown that needs replacing. The good Dr. removed the existing crown and then did lots of grindy stuff (at one point my head was rattling so much I think he was using an actual drill bit), and then he put a LASER in my mouth. Which was fine while half of my face was numb, even when I smelled smoke (why was there smoke coming out of my mouth?), but now it does ache and my gums are not happy about this. Motrin has little effect, perhaps its time for a glass of something...
February 27, 2009
Notes to myself...
Just in case I take this thing apart and start over, which is possible, I need to remember these things;
gauge is more like 2sts per inch, 4 wrap n turn rows are enough, start provisional co w 16sts, use 6 sts for starting sleeve at collar, divide sleeves w 36ish sts per sleeve and 90 sts total for
body. Thats all for now.
gauge is more like 2sts per inch, 4 wrap n turn rows are enough, start provisional co w 16sts, use 6 sts for starting sleeve at collar, divide sleeves w 36ish sts per sleeve and 90 sts total for
body. Thats all for now.
February 23, 2009
Carding and Hoody update
OK, back to the carding discussion. A little over a week ago, Wendy emailed this link to Kelie and me. It's a blog post from Yarn Harlot, about feeding fiber into the drum carder sideways! REally! Heck, why not? Personally, it seemed to me that no amount of teasing, fluffing and feeding fleece as perfectly straight as possible into the drum carder guaranteed it ending up perfectly straight in the batt. My sideways fed fiber comes out looking pretty much the same as the other stuff. So, if nothing else, feeding the fiber in sideways saves me some time. And I like that.
Over the weekend I really, truly got started with my hoody project (btw; hoodie and hoody will be used interchangablely in this blog). I looked and looked for a pattern I wanted to use with my hand dyed homespun (not my homespun, but some I purchased just before I started spinning). Whilst I viewed many lovely patterns, most weren't right for this yarn which is mostly heavy Aran to chunky/bulky. So I decided to adapt and improvise. I want to knit a top down, raglan sleeved pullover sweatshirt with a medium deep, overlapping placket. Toogles or froggs or buttons will close the placket. I like pockets, so either handwarmer pockets or a kangaroo pocket, plus a small sleeve pocket for holding something like a cell phone or ipod or clip on sunglasses. Contrasting color yarn might be used in places. And I might add just a little shaping, and for sure fold over sleeve cuffs that have thumb openings. I think that covers everything.
This is my first raglan sweater, and for inspiration and reassurance, I am constantly consulting Custom Knits by Wendy Bernard, and a hooded cardigan pattern called Katje, designed by Julie Weisenburger. I liked Katje as soon as I saw her, and her sister, Katarina too.
I worked up a swatch on US #13 needles (ok, I started with #9, then #11) and decided my gauge is 10sts x 13row over 4" square. I even washed and blocked my swatch, I never do that! Right, so using a long tail provisional cast on I started out with 25 stitches. Pause - here is a plug for this type of cast on, I like it, it was very straight forward for me. Resume - after 4 or 5 hours of knitting away, I decided I'd started out with too many stitches and ripped everything out. I ended up feeling like Goldilocks, the first hood was too big, the second one too small and the third one just right. So after working away for most of the weekend, I finally have my hood and have started the sweater body and sleeves. Katje flows smoothly from hood to sweater with no neck seam, but I think this heavier yarn needs more support, so I cast off what would become the sleeve and back neck stitches, leaving the fronts live, and then came back and kicked up and knit the sleeve and back neck stitches along with the fronts. Ummm, does that make any sense? Will this acheive the goal of adding more structure to the back neck? I don't really know, and suspect I'll find out later.
Over the weekend I really, truly got started with my hoody project (btw; hoodie and hoody will be used interchangablely in this blog). I looked and looked for a pattern I wanted to use with my hand dyed homespun (not my homespun, but some I purchased just before I started spinning). Whilst I viewed many lovely patterns, most weren't right for this yarn which is mostly heavy Aran to chunky/bulky. So I decided to adapt and improvise. I want to knit a top down, raglan sleeved pullover sweatshirt with a medium deep, overlapping placket. Toogles or froggs or buttons will close the placket. I like pockets, so either handwarmer pockets or a kangaroo pocket, plus a small sleeve pocket for holding something like a cell phone or ipod or clip on sunglasses. Contrasting color yarn might be used in places. And I might add just a little shaping, and for sure fold over sleeve cuffs that have thumb openings. I think that covers everything.
This is my first raglan sweater, and for inspiration and reassurance, I am constantly consulting Custom Knits by Wendy Bernard, and a hooded cardigan pattern called Katje, designed by Julie Weisenburger. I liked Katje as soon as I saw her, and her sister, Katarina too.
I worked up a swatch on US #13 needles (ok, I started with #9, then #11) and decided my gauge is 10sts x 13row over 4" square. I even washed and blocked my swatch, I never do that! Right, so using a long tail provisional cast on I started out with 25 stitches. Pause - here is a plug for this type of cast on, I like it, it was very straight forward for me. Resume - after 4 or 5 hours of knitting away, I decided I'd started out with too many stitches and ripped everything out. I ended up feeling like Goldilocks, the first hood was too big, the second one too small and the third one just right. So after working away for most of the weekend, I finally have my hood and have started the sweater body and sleeves. Katje flows smoothly from hood to sweater with no neck seam, but I think this heavier yarn needs more support, so I cast off what would become the sleeve and back neck stitches, leaving the fronts live, and then came back and kicked up and knit the sleeve and back neck stitches along with the fronts. Ummm, does that make any sense? Will this acheive the goal of adding more structure to the back neck? I don't really know, and suspect I'll find out later.
February 21, 2009
Hoody project happenings
Here is a picture of my resource pile for my new project. After nearly a week of contemplation, I have some idea of the look I want for my hoody. That, or I'm so done with thinking about it, I just
have to get something on my needles. (Ummmm, nice soft squishy wool yarn...)
Subscribe to:
Posts (Atom)